
So one of my go-outside-and-touch-grass hobbies is photography, which I periodically share on my dedicated website for this purpose. Now I could have gone out and picked a nice photography geared product like SmugMug or Flickr, uploaded all of my photos and called it a day but that wouldn’t be keeping with my cloud engineering background and passing up an opportunity to learn as well as over-engineer something!
So similar to this website, I wanted to build a statically generated site full of my photography, throw it all in S3 behind CloudFront and call it a day. I also wanted to ship mostly just HTML & CSS to the client (after all it’s just displaying pictures) and only rely on frontend JS to add a few extras (e.g. client side navigation, keyboard shortcuts, etc). The other focus was performance, not just how fast can I return the first byte, but also how can I most efficiently ship the right sized images, at the right time, to the right device no matter the form factor, display density or size.
All of these lead to quite a complex backend for what is a fairly basic static website, but it’s easy to update and I had a lot of fun making it!
The workflow
Probably one of the most important parts for me was for this website to have a smooth workflow to publish to, while meeting all of the goals mentioned above. The general workflow is broken down into three steps:
- Local workflow: Curating, editing and exporting locally to my NAS (which automatically syncs to an S3 bucket). Just using standard desktop software.
- Online workflow: Custom tools for resizing images into optimal web sizes and formats, extracting and adding metadata like titles, descriptions, locations, camera settings, etc.
- Publish workflow: Building and deploying the site once I was happy with my updates.
See the diagram below to get a high level overview of how these steps fit together:
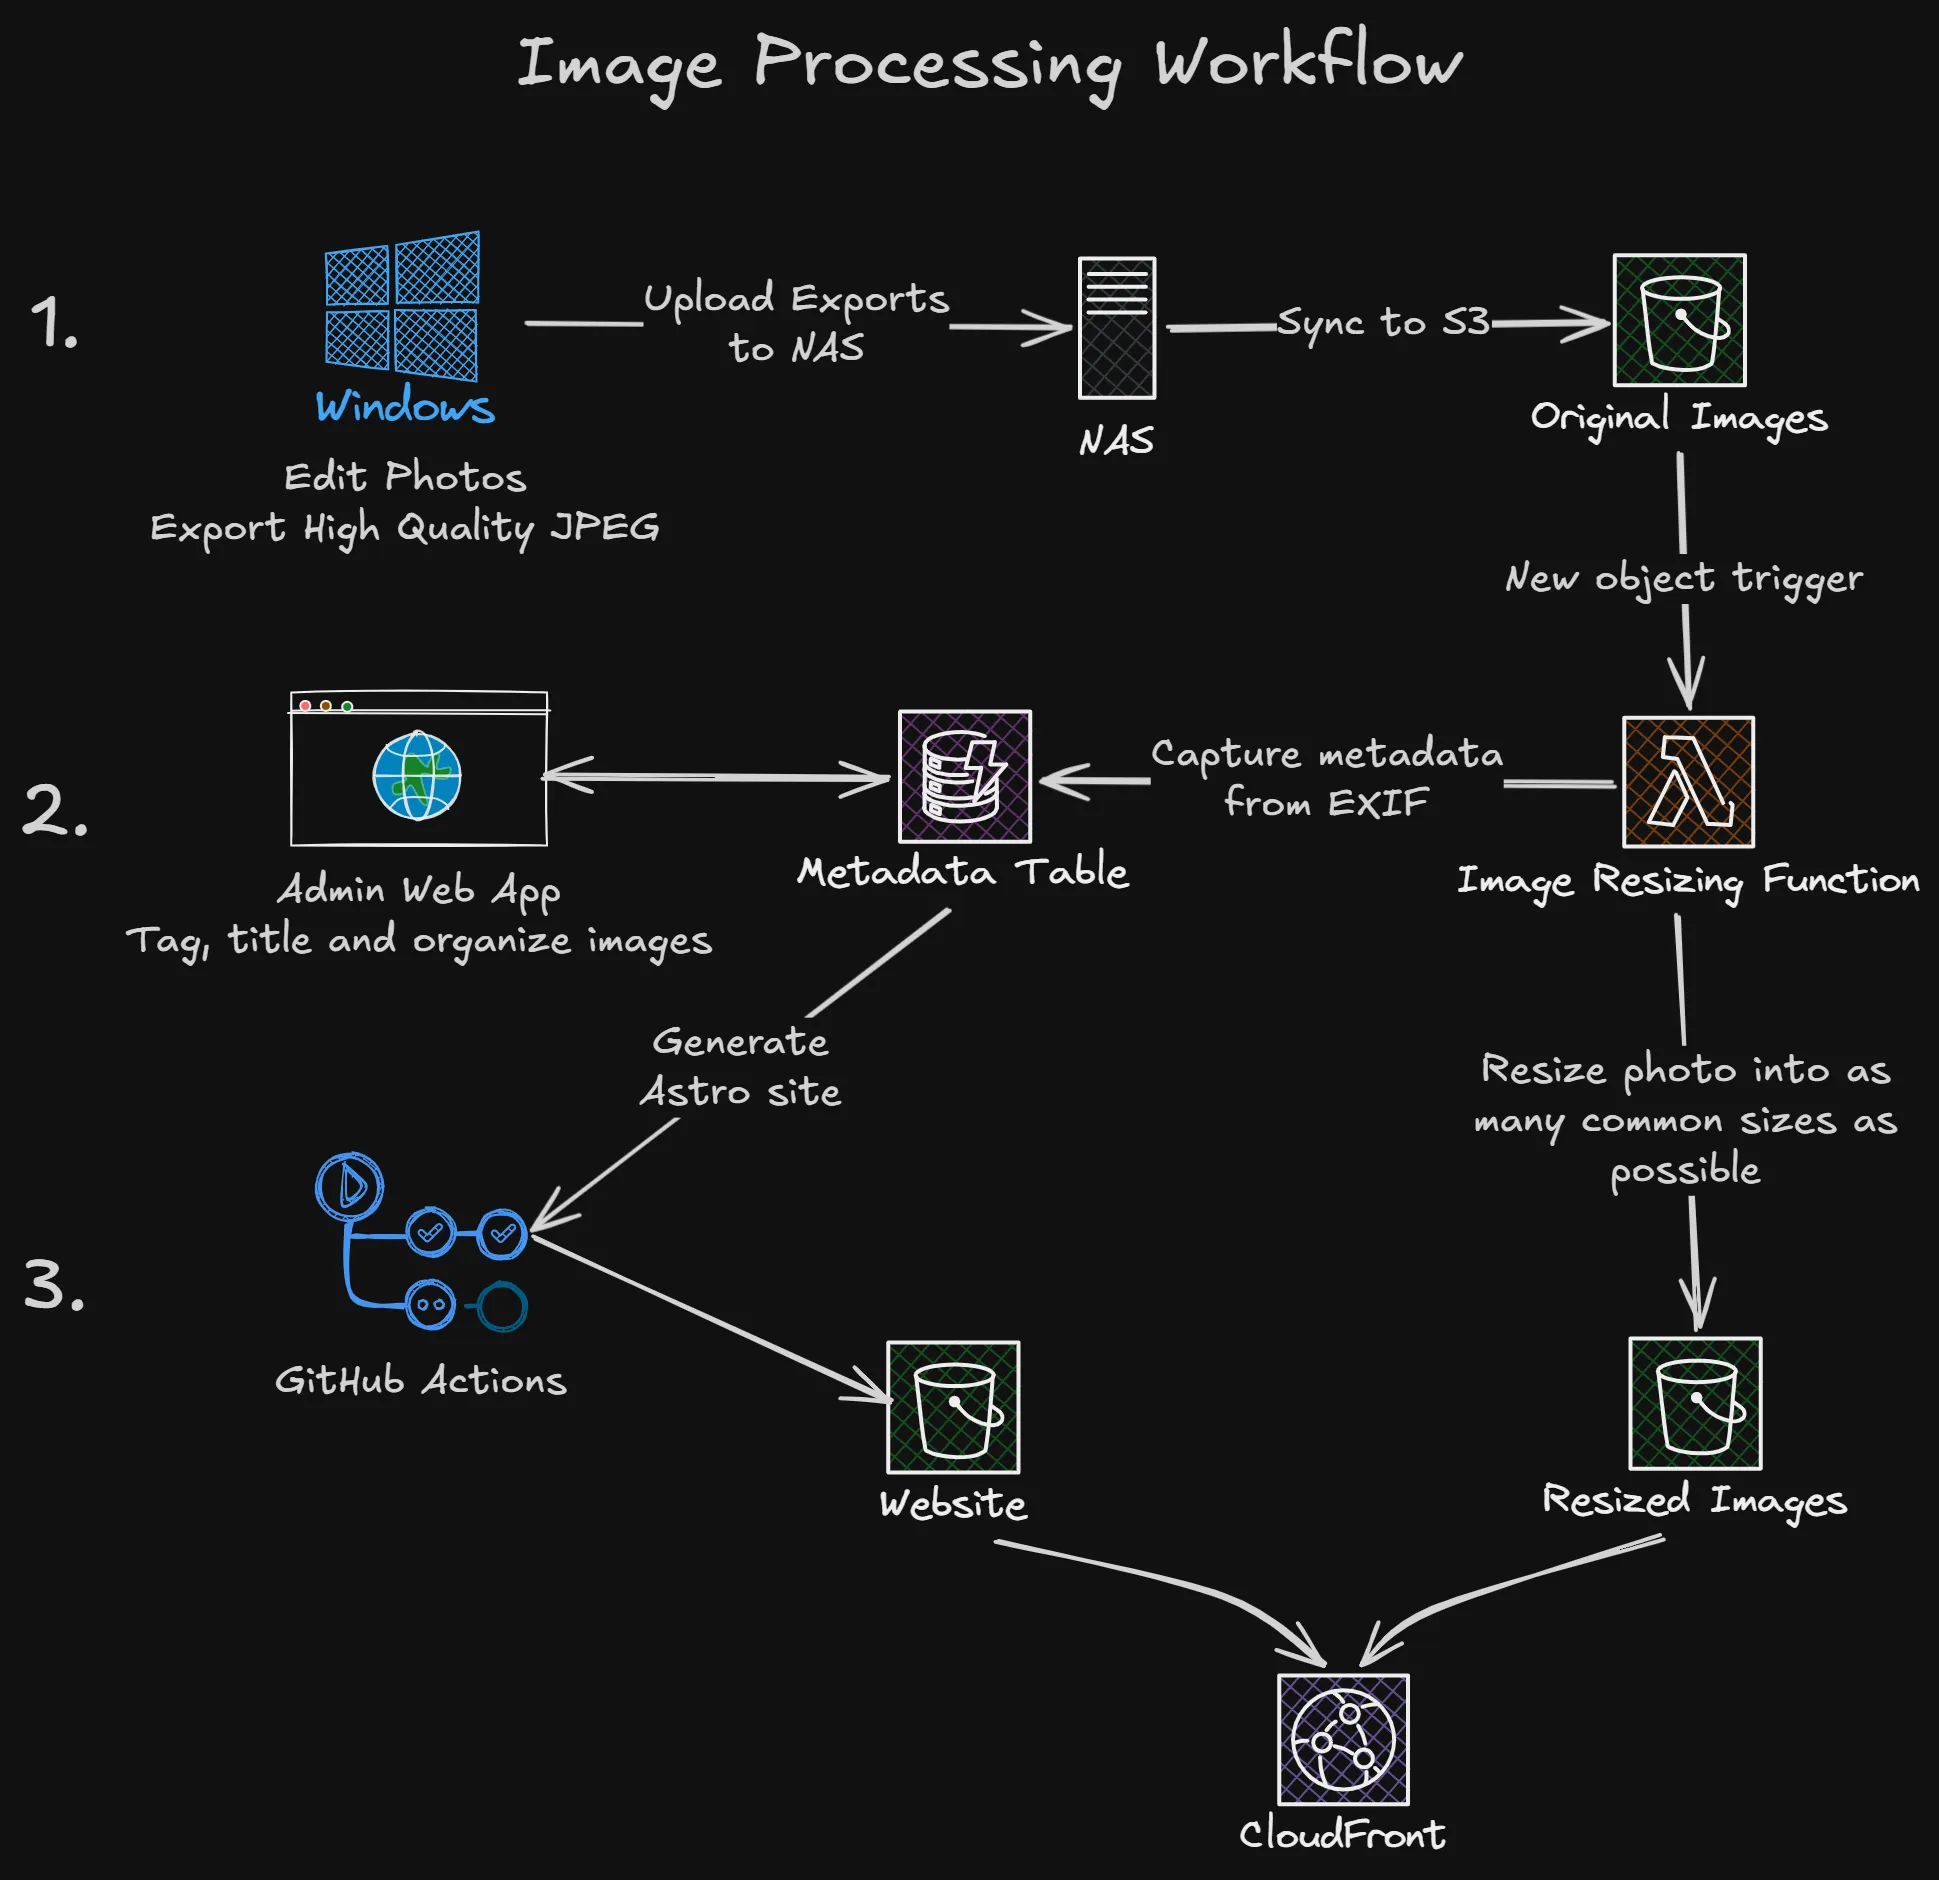
This workflow separates the building of the website away from the operation side of things, when I’ve got a photo I want to share I don’t have to open an editor or terminal at all, but likewise when I want to do some development work, all of the content of the site is pulled from this online service so my dev environment is fresh up to date every time I run pnpm dev.
Adding photos
So when I’ve had a day out taking photos, come home and dumped my SD cards back onto my laptop I’ll fire up DxO Photolab and start sorting/editing/finding-the-bit-of-dust-on-the-lens-I-missed and eventually have a couple of photos that I want to share on my website in my exported photos folder.
From that folder I copy them into the very imaginatively named Website folder on my Synology NAS where this process kicks off. I’m using Synology Cloud Sync to keep that Website folder in sync with the Originals bucket in S3 and as soon as a new object hits that bucket, the Resize Image Lambda function kicks in, copies the image to the Resized Images bucket, creates the alternate sizes, extracts the metadata and adds the whole lot to DynamoDB.
This happens within the few seconds it takes me to navigate to the admin site and get logged in with my pass key. There I’ll see a nice NEW badge on any photo I’ve just copied to the NAS where I can assign it to a gallery, add a title, location, description, etc.
When I want my changes live, I simply run the same GitHub Actions pipeline as the CI builds. That CI build is smart enough to only build and deploy what is required, including content changes, so it will kick off a website build and deploy it live!
The whole process of export → upload → categorize → publish can be done in a few minutes, and it can all be done remotely from my phone if I want.
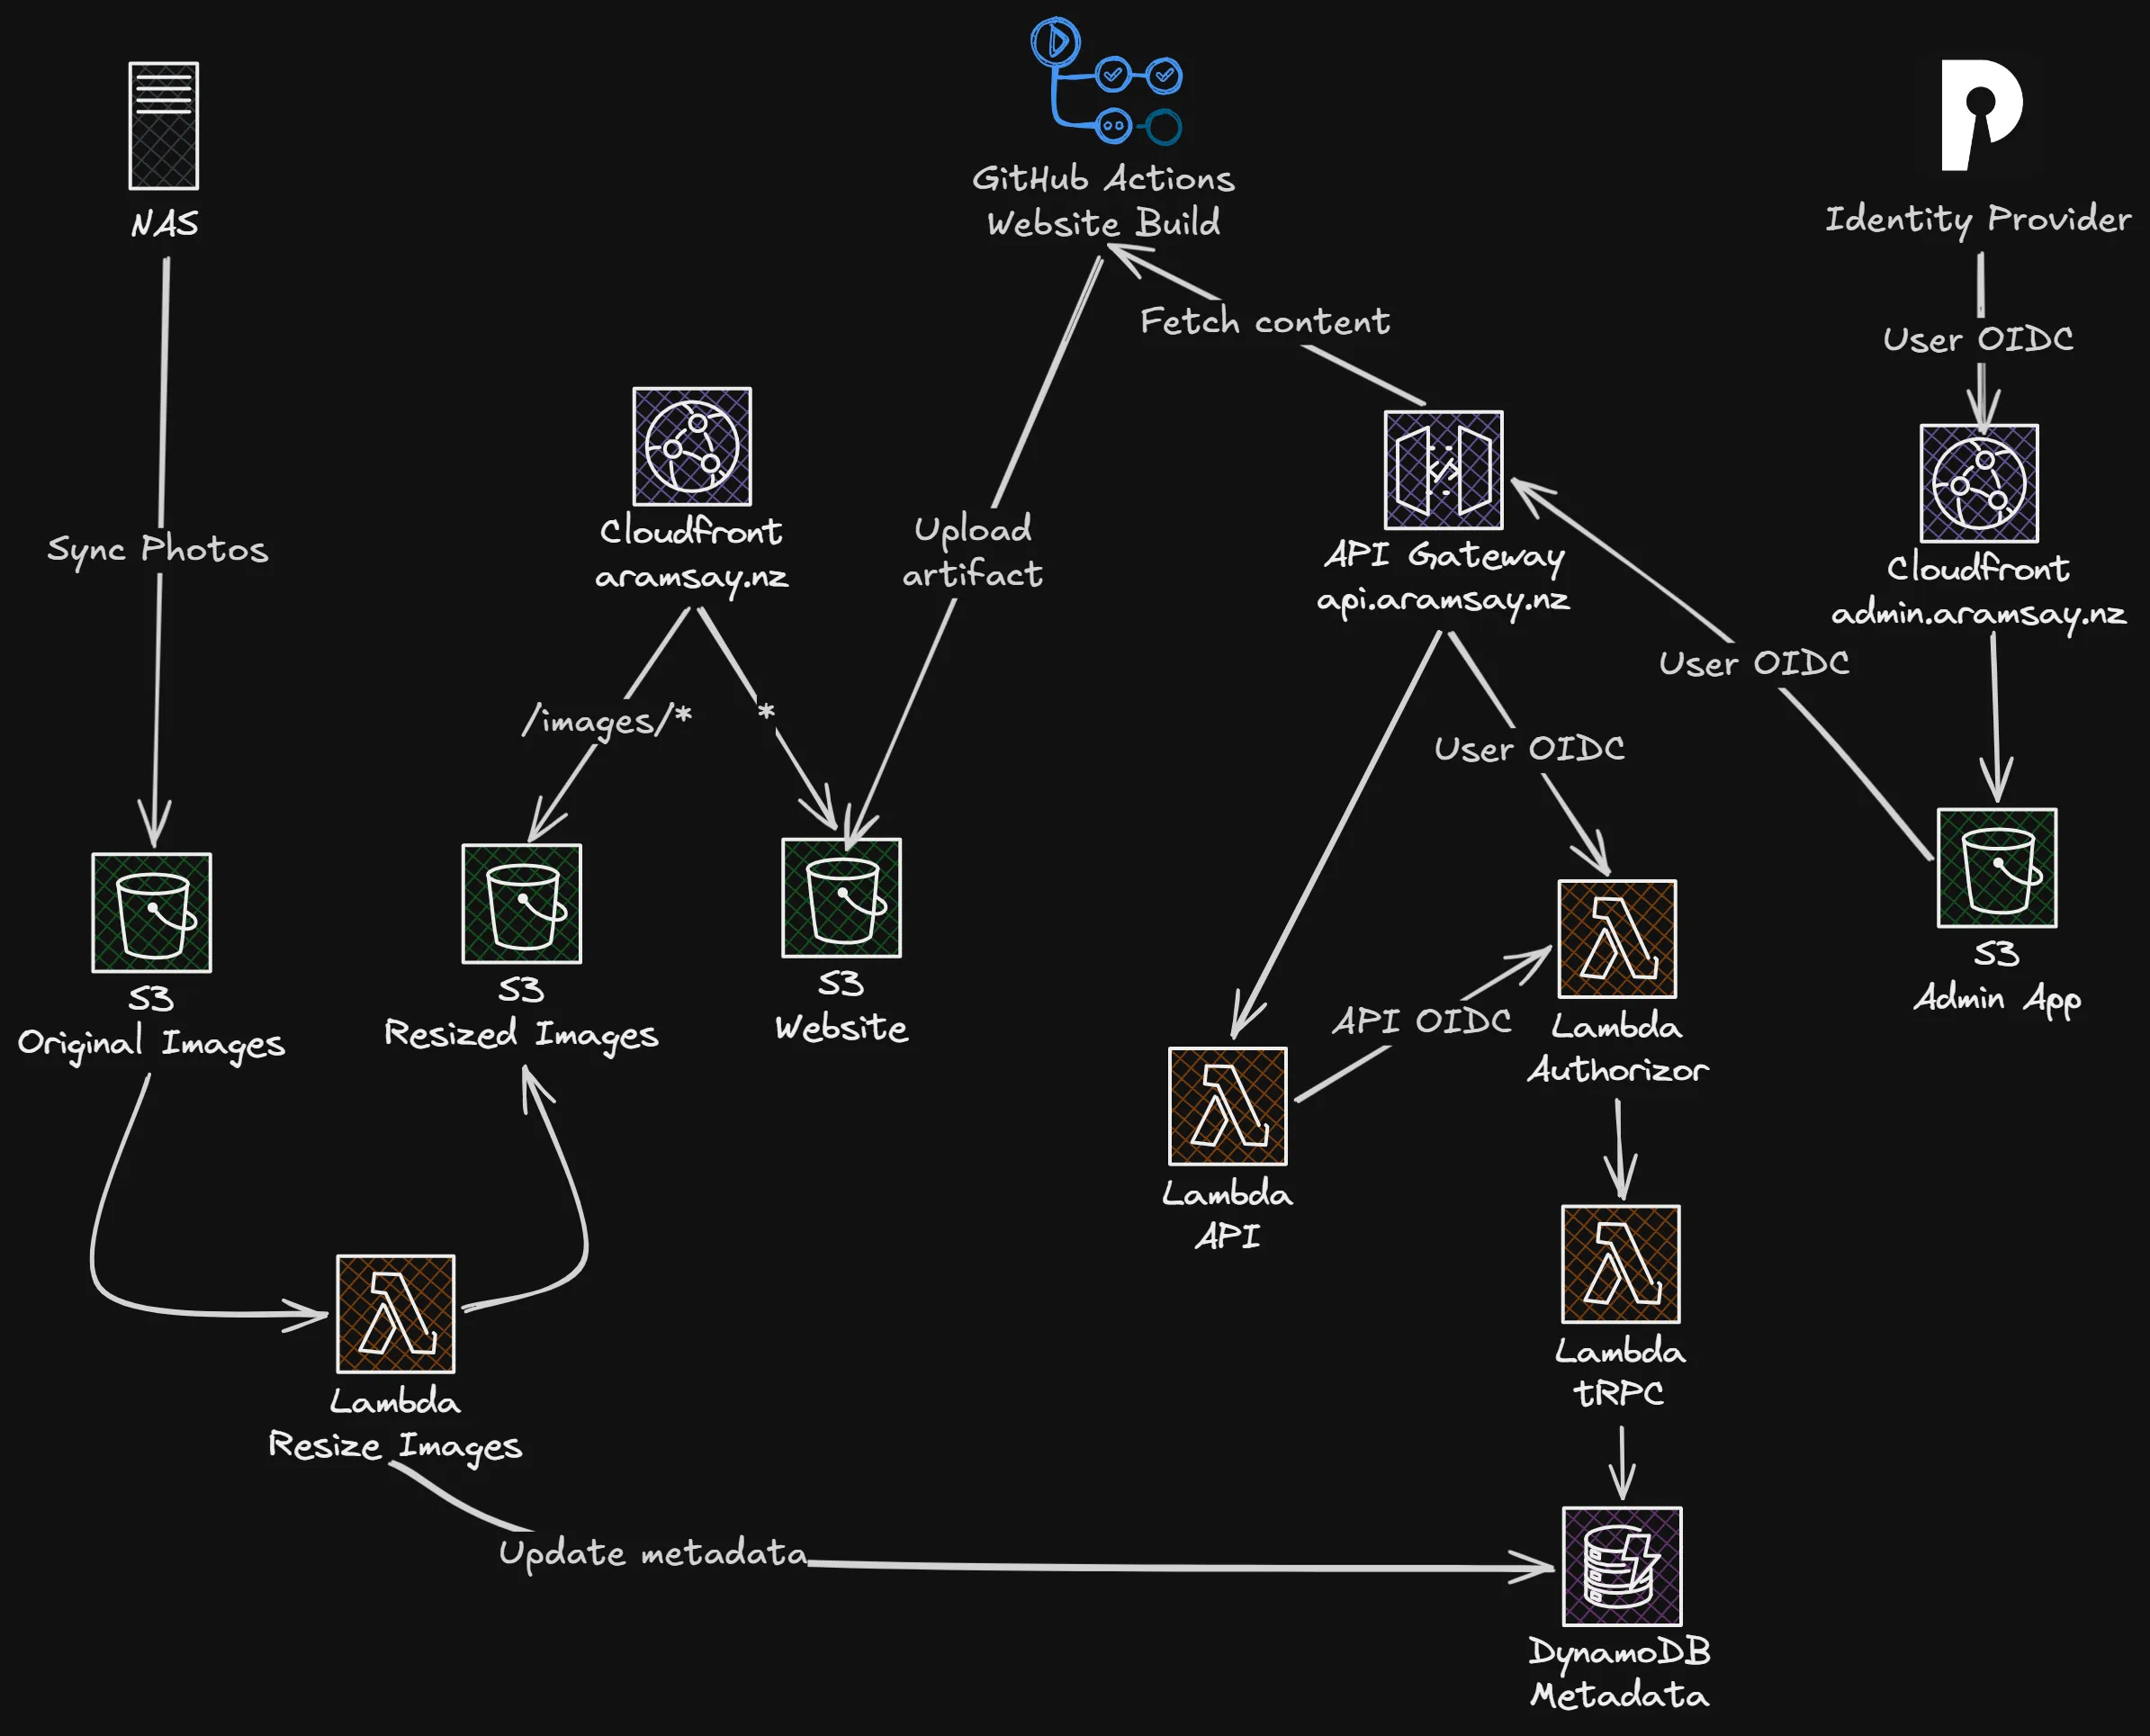
The architecture
Flipping the above diagram around a bit, we’ve got three main components to this project:
- The website itself
- The backend APIs and storage for content management
- The admin tool
The website
This is in a way the simplest part of the stack, an Astro website that uses content collections to pull all of the data from the backend API. The main structure and categories of the website are built in this part, but without the content collections it would just be the home page and the four category pages.
The backend APIs and services
This is definitely the most exciting part of the project. I didn’t want to hide these away in my home lab, I wanted to have them running, in public, on a serverless platform.
Scale to zero was very important for managing costs, and also having the output a static website rather than hitting an API on page load for seldom changing content.
A key part of this being public was authentication, not something I wanted to roll myself but important to get right. There is a public component of the API, because the content is entirely public anyway, but any write-based requests (e.g. updating a description) need to be authenticated. The other technique I took was relying on triggers, messaging and async work as much as possible so HTTP didn’t even need to be part of the mix.
Resizing photos and extracting metadata
The core feature that started this whole process, is I didn’t want to just ship original size, ~20MB JPEGs to your phone or laptop display, it’s wasteful and it costs me bandwidth. I also didn’t really want to do just in time resizing, this works pretty well, but I have a pretty small number of permutations given the number of photos, formats and sizes I was targeting so for the best possible end user performance I setup a Lambda function that uses sharp to generate more screen friendly sizes in both JPEG and WebP, then identify the version with the best compression for final display.
💡 Interestingly JPEG compression seems to perform better for most landscape photos, but WebP gives the best results in astro!
While resizing the photos I use exifr to extract EXIF data for which camera and lens was used, shutter speeds, focal lengths, capture date, etc. All of this data then gets collated into a DynamoDB table ready for further enrichment from me.
APIs and metadata
All of the data is stored in a single DynamoDB table, using a generic Pk and Sk primary/sortable key pattern. Primary key is always something like IMAGE or GALLERY, the the sort key is a compound key of whatever makes sense based on the data type. This allows for efficient querying and fast retrieval of data without incurring too much cost for DynamoDB reads or writes. A stable Pk also allows me to have a super type for all possible data types, then dynamically narrow the type when processing each kind of data just by checking Pk.
There are two APIs fronted by API Gateway, one public API that is based on Hono which gets used by the Astro build process, and a second tRPC API that is behind authentication which is the main data layer. The public API authenticates itself against this tRPC API for reading data, while the admin tool goes directly to the tRPC layer.
Authentication & Authorization
It’s worth having a look at the authentication system on its own, it’s all based around OIDC using off the shelf parts where possible.
For authentication, I wanted something prebuilt, that I could use across my projects/home lab that just did the basics, but cleanly. I don’t have a huge pool of users to manage, but I did want something standards compliant that uses pass keys/WebAuthN and was nice to work with. I settled on Pocket ID running in my home lab. It only supports WebAuthN too which is a nice bonus. This means I can setup a Public/PKCE OIDC client for the admin site, then pass that token through to the API for authorization.
Since API Gateway has the concept of authorizers it means all of my authorization logic can be used in a shared Lambda function that returns an IAM policy that either allows or denies Lambda execution.
The function itself has two valid providers it will trust, one being Pocket ID mentioned above, the other being the public API (which implements its own OIDC provider to sign its own requests). Since all of the involved providers support the .well-known/jwks.json endpoint standard and are public, the Lambda function can fetch the public keys and perform the JWT validation.
The admin app
The final piece is the admin app, which is a React based Vite SPA, using react-oidc-context to provide client side authentication context. If no auth context is present, it redirects off to Pocket ID where the user authenticates then redirects back with a token that can then be forwarded on as part of API calls. The application doesn’t need to hold any user data, and the API doesn’t need to trust the application explicitly, but since they both trust the same identity provider, and we know the client ID, once we verify the JWT we can trust the requests are legitimate.
Wrapping all of this up into a diagram looks something like this:
The tech stack
I’ve mentioned quite a few of the frameworks and libraries I’ve been using already, but I’ll cover all of the major ones here, as well as the general project structure.
I went through a few repository schemes (individual repos, NPM workspaces, Turborepo) but finally landed on pnpm workspaces and have been really happy with the tooling available. NPM workspaces looked promising as the simplest option but I ran into a lot of cross project dependency issues, Turborepo was way too opinionated for my liking and felt more complicated in the way it handled environments, etc but pnpm workspaces hit the sweet spot.
I maintain two distinct workspace areas of the repo:
apps/*: The three main applications (website, backend & admin). These map to the build artifacts.packages/*: The (usually shared) components of the stack that aren’t deployed on their own but are included by (and build as a dependency of) the top level applications.
IaC platforms
- AWS CDK: Coming from a CloudFormation background, CDK has been quite nice to work with, especially in that serverless space where application does interact with infrastructure a bit more (e.g. triggers and policies for Lambda functions) so it’s the basis of the backend for this project.
- GitHub Actions: The build and deployment of everything runs through GitHub Actions using a couple of custom actions, one to calculate artifact hashes in the monorepo to compare with what’s in production to only build what’s needed, and another to upload changed files to S3 and intelligently manage Cloudfront cache invalidations.
Frameworks
- Astro: I settled on Astro as a static site generator after trying out lots of others over the years, but it’s really nice to build with, static first (unlike some other frameworks that have static as an output option, so no weird hydration issues) and can pull in React via Vite very easily.
- Vite: My goto for pure React applications at this stage, very easy to get up and running, and works well with my platform engineer brain.
- Hono: Modern, lightweight and very portable API framework. It’s very extensible through middleware, etc and has lots of runtime options so drops into a Lambda function or a standalone NodeJS server with the same core code.
Libraries
- Zod: Zod is a validation tool that can be run nearly anywhere, so instead of using regular TypeScript types for my data models, they are all expressed as Zod Schemas in a shared project, meaning I can have the same validation and type safety right through the project.
- tRPC: Building onto Zod, the validation and typing of APIs can be enforced by tRPC, where I get type safety and a react-query based client for accessing my API. This is an area I will continue to check out other options because things have moved around a bit since I started using tRPC and the setup can be a bit confusing.
- Sharp: The backbone of my image processing pipeline. I originally tried starting this project with ImageMagick (which we used to run fleets of in EC2 in a previous role) but running that in Lambda turned out to be a bit more of a challenge than I thought. Since my requirements didn’t need all of the depth of functionality that ImageMagick provides and raw performance as well as memory footprint was of concern, Sharp was perfect since it works really well in NodeJS and therefore a Lambda environment.
- TailwindCSS: Probably the most controversial choice here, I know… but it works for me, I quite like it and it’s hugely popular which helps on the whole learning curve for a platform engineer trying to write CSS!
Thanks!
Thank you for making it this far, I hope some of this content has been informative or helpful. If you want to see this website in action, head on over to https://aramsay.nz to have a look!